


MO Tested: Rabaconda Tire Changer and Balancer Review

If it can change this stiff 20-year-old tire, it'll handle most jobs

If you’re a motorcyclist with a social media account, there’s a good chance you’ve seen an ad or two pop up for a company called Rabaconda. Whether you ride dirt or street, they have a tire changing system they claim is super easy and super fast to use. Better still, it’s light, compact, and portable so you can store it or take it with you, wherever you ride. I’d seen these ads over and over in my feed and saw video after video from owners showing how much they love theirs. As a regular tire changer, and someone with limited space to work on bikes, this sounded like exactly what I was looking for in a tire changer. Except I’m very skeptical of ads I see on my social feed.
Thanks to Kershaw Knives for making this video possible. Use discount code Motorcycle40 for 40% off at https://kershaw.kaiusa.com/ until December 31st, 2024.
Also, there was another problem: I already own a tire changer – a No-Mar Classic HD. After helping Evans by being the photo model for his review of the No-Mar changer, I eventually bought one of my own. It works great, except it’s heavy and takes up a lot of space. Those were two strikes against it in my book, and because I don’t want to bolt the No-Mar down to the floor of my 10x10 shed, I attach it to the tow hitch on my van. That means lugging it around from my shed to my van, which gets really annoying really fast.
After watching videos and listening to my circle of friends who spent their own money (anywhere from $649 - $800, depending on the kit) raving about it, eventually a Rabaconda Street Bike Tire Changer made its way to my home. Specifically the Ultimate Kit, which includes basically everything to change tires on wheels as small as 12 inches and as large as 21 inches. This means the tire changer, two drop center tools, tire lube and brush, 15mm spindle kit, and multiple hub adaptors for rear wheels with hubs ranging from 32mm to 68mm, including BMWs and Ducatis. In addition, Rabaconda sent me its new wheel balancer also, itself with some handy features I’ll cover later.

Despite getting its start with its dirtbike tire changer a decade ago, I still wasn’t an early adopter of Rabaconda’s street bike tire changer. I’d seen and tried other products that claimed to be quick, easy, and portable tire changers that ended up being duds. Since my No-Mar had proven itself a worthy tire changer, if a little large and cumbersome, I wasn’t in any rush to pick up something else to replace it until I felt confident it would suit my needs better (ie. be smaller and easier to use). Now, after a few tire changes, I echo the positive reviews of everyone else. Here’s why.
Its Size
Like I mentioned earlier, I don’t have a lot of space. So I like to maximize the space I do have. When disassembled and in the carry bag for storage, it only measures 27.5 x 11 x 9.8 inches, making it easy to tuck away. It only weighs 30lbs, too, so moving it or carrying it isn’t an issue.

When fully assembled, the Rabaconda leaves a small footprint and I don’t need to leave my little shop or haul big, bulky pieces to my van to use it. Whether you have a lot of space or not, I don’t see this being anything but a positive.
It’s Easy To Use
I’m oversimplifying here, but the basics of removing a tire are straightforward: deflate the tire completely, break the tire’s bead from the rim, get a lip of the tire over the rim, and continue leveraging the lip over the rim while spinning the tire around completely. Then repeat for the other side. Installation is basically the reverse: wedge the tire’s lip over the rim and spin it while keeping the opposite end in the center of the wheel – known as the drop center – until one side is fully on. Then repeat for the other side. Inflate, balance, and off you go.

The big tire shops use a pneumatic tire machine to do their work because of the volume of tires they change, but the Rabaconda effectively replicates them. The secret sauce is the “duckhead” used to leverage the tire on or off the rim. The pneumatic machines use air to spin the wheel around the duckhead for tire removal; the Rabaconda uses human power and physics to spin the duckhead around the wheel.
Other machines, like the NoMar, use a big rod with attachments at each end – called a mount/demount bar – to either pry the tire up and over the rim or press it down, depending on if you’re installing or removing a tire. A stationary rod in the center allows the user to pivot the bar around the wheel. I’ve found the mount/demount bar a little tricky to use, and the Delrin blocks at the base of the NoMar changer to accommodate various wheel sizes can also be hard to figure out. The Rabaconda is simply easier to use.

I won’t go over in detail how to change a tire since tutorials are all over the internet and videos explain the process much better than words can. In fact, here’s how to remove a tire, and here’s another one covering installation.
Putting It To The Test
Yes, those videos used sport tires as examples, which are usually softer (and thus easier) to install. Browse around Rabaconda’s page for more examples with other tires ranging from ADV tires to cruiser tires and you’ll see the process, and the tire changer, work. Better still, do a generic search and you’ll find individuals completely unassociated with Rabaconda changing their own tires with good results.
Since I, too, was a skeptic I wanted to find out for myself how the product was like to use, and I had the perfect tire for the test – a 120/60-17 Bridgestone BT-014 from my 2000 Suzuki SV650 that had sat outside since the day I took the wheel and tire off the bike 20 years ago. The shallower sidewall compared to the 120/70 front tires more commonly seen on street bikes would be a challenge in itself, but two decades of sitting outside, getting blasted by the elements, basically made the tire stiff as a board. If the Rabaconda can help me install (and remove) this tire, then I could work with anything.

Changing tires isn’t a hard job – it’s all about leverage. At its core, taking a tire off starts with breaking the tire’s bead on the rim, leveraging it over the rim, and prying it off. Putting a tire on requires keeping the bead approximately in the wheel’s “drop center” (the middle of the rim). If the tire is new, soft, and malleable – like a sport tire – that’s usually pretty easy. Tires with stiffer sidewalls like ADV, touring, and cruiser tires – or, yes, a 20 year-old weather-beaten Bridgestone – get increasingly harder. Different kinds of drop center tools are out there and Rabaconda includes two of them with each Street Bike Tire Changer, even the basic kit. Place these opposite the bead of the tire already over the rim, and they’ll help the tire bead stay in the drop center as the duckhead moves around.
These tools proved critical when changing my old Bridgestone. New sport tires, with their soft sidewalls, are often able to slip the first bead up and over the duck head, and you can then push the entire bead onto the wheel fairly easily. Stiffer tires like the ol ‘Stone here took some muscle to get the first bead up and over the duckhead in the first place, then using the Rabaconda’s ratchet-style duckhead got the rest of the bead on.

The real challenge was the second bead. Again, it takes muscle to slip the bead up and over the duckhead, but pushing down on the sidewall did almost nothing (on new tires I can usually push some of the remaining sidewall onto the wheel). I tried a few things to help get the bead started, like using the supplied tire iron (with a plastic protective sheath) to leverage more of the tire over. Then, instead of placing them on the opposite side of the tire, I placed a drop center tool near the part of the bead over the duckhead and used the leverage of the main ratchet handle to get the Rabaconda’s duckhead started. I had to ratchet slowly, and as it rotated I could reposition the drop center tools further away from the duckhead. Eventually I could remove the drop center tools altogether and ratchet the duckhead completely to finish the installation.
No Lube Tire Changes
If you read my process carefully, you’ll notice I didn’t use any tire lube – that was on purpose. Tire lube would have definitely made the process easier, but I went without for two reasons. First, if the Rabaconda could help me install my hard Bridgestone without lube, then theoretically any other tire should be a breeze. Especially if I do use lube. (Side note: the Ultimate Tire Changing Kit includes lube, but if you don’t have any, soapy water or even hair spray will do the trick.)

My second reason involves track tires specifically. When ridden in track conditions, high-horsepower motorcycles (and sometimes bikes without a lot of horsepower) can accelerate so hard that the tire itself will spin on the rim. This is seen with a straight line placed on the tire and wheel with a marker when the tire is newly installed. After a session, if the two marks are no longer aligned, then the tire spun on the wheel. Installing a tire with lube increases the likelihood of this happening. In extreme cases this can lead to the wheel now being out of balance, causing potentially dangerous vibration. So track tires, especially slicks, are often mounted without lube to minimize the chance of the rubber spinning on the rim. With the Rabaconda, lube-free tire changes are easier than any other method I’ve tried short of a pneumatic machine.
The Balancer
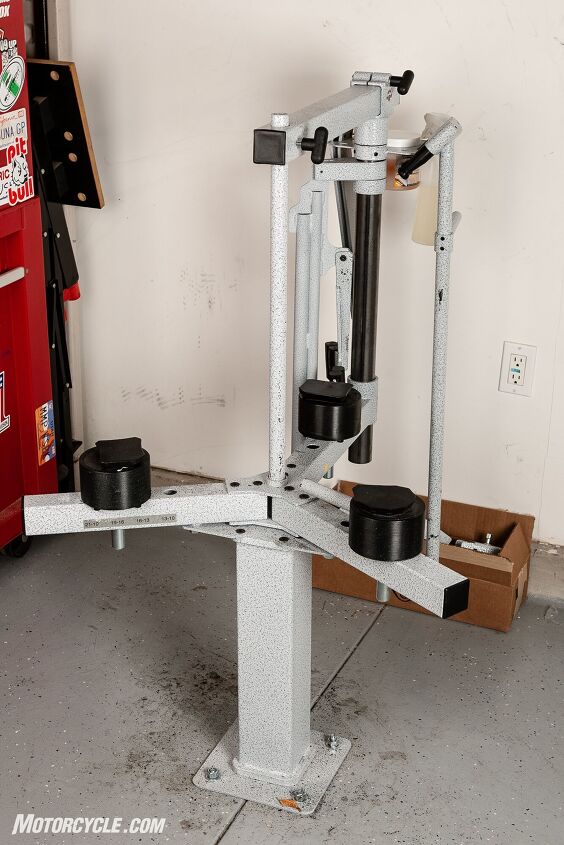
Speaking of balancing, now’s a good time to introduce Rabaconda’s wheel balancer. Static wheel balancers are nothing new, and at first glance, the Rabaconda balancer doesn’t look much different from the rest. There’s a base plate with adjustable feet, two uprights with ball bearings at the top, and a rod in the center that goes through the axle of the wheel. It even works the same, too. You let the wheel spin on the balancer until it stops, mark the heavy point, and add weight to the opposite end until the wheel doesn’t spin anymore.

The Rabaconda’s difference is its flexibility. Like the tire changer, the balancer is easy to transport. The uprights are held in place with an allen bolt each. Remove them and you can place both uprights, the base, and the rod inside the provided carrying case and take it with you just like the tire changer. Besides that, the balancer also comes with an attachment to mount it to a wall if you prefer. When finished, you can either pack everything up in the bag, or simply remove it from the wall, flip it, and place it back on the mount so the uprights are pointed down at the ground instead of out in the open. It’s pretty clever.
Also clever is the ability to tighten a cone on the rod to ensure a solid fit to the wheel. With other balancers, you slip the rod through the axle, snug the cone to the bearing, and tighten the cone in place with an allen key. With the Rabaconda, after tightening the cone into place with the provided allen key, you can turn the knurled edge of the cone with your fingers to screw in the cone even further and fine tune the tightness to the bearing. Is it necessary? No, but it sure is nice to have.


It’s not a big difference, but this shows the difference between the cone all the way out and in.
Again, this isn’t meant to be a tutorial on how to use one, as those can be found all over the internet. In fact, here’s Rabaconda’s Jackson Halsmer with an official tutorial.
Drawbacks
As much as I’m a fan of the Rabaconda Street Bike Tire Changer, it’s not perfect. For many, the biggest hurdle for getting a tire changer in the first place is the cost. Starting at $650, the Rabaconda tire changer isn’t necessarily cheap. But it will eventually pay for itself if you ride enough and go through tires. Better yet, have your buddies come to you to change tires for a fraction of what the shops charge and the machine will pay for itself in no time.

As for the changer itself, other drawbacks I could see is if you have multiple bikes with single-sided swingarms and different hub diameters. Odds are you’ll have to buy different hub adapters from Rabaconda. Fortunately, ADV riders with spoked wheels can still use the changer, even if they run tubes in their tires. If you run a bib or mousse, you’ll have to get a different changer – which Rabaconda also sells.
Consider Me Sold
Rabaconda’s done a great job viral marketing itself across social media, but if the product truly works, eventually users take over and spout the product’s virtues for you.
Specifications
- Price: $649
- Wheel Sizes: 12-21 inch
- Wheel Hub Diameter: 15-32 mm
- Materials: Galanizied Steel with plastic mounting head, wheel supports and bead breaker cover
- Weight: 37 pounds
- Carry-bag Dimensions: 29 x 11 x 10 inches
- Shipping Weight: 41 pounds
- Shipping Dimensions: 31 x 11.5 x 8 inches
- Warranty: Lifetime warranty for manufacturer defects
- Manufacturing Location: Made in the EU
We are committed to finding, researching, and recommending the best products. We earn commissions from purchases you make using the retail links in our product reviews. Learn more about how this works.
Become a Motorcycle.com insider. Get the latest motorcycle news first by subscribing to our newsletter here.
Troy's been riding motorcycles and writing about them since 2006, getting his start at Rider Magazine. From there, he moved to Sport Rider Magazine before finally landing at Motorcycle.com in 2011. A lifelong gearhead who didn't fully immerse himself in motorcycles until his teenage years, Troy's interests have always been in technology, performance, and going fast. Naturally, racing was the perfect avenue to combine all three. Troy has been racing nearly as long as he's been riding and has competed at the AMA national level. He's also won multiple club races throughout the country, culminating in a Utah Sport Bike Association championship in 2011. He has been invited as a guest instructor for the Yamaha Champions Riding School, and when he's not out riding, he's either wrenching on bikes or watching MotoGP.
More by Troy Siahaan


Comments
Join the conversation
I've mounted my No-Mar to a wooden pallet I made, so it is stable to use but not bolted down. But it still takes up more space than the Rabaconda. Works well though.
Works great, fast learning curve and packs down when not in use. Removes the frustration and struggle of changing tires on the garage floor (no flying tire irons), or struggling to use a Harbor Freight tire changer without scratching the rim (pita). Expensive, but well engineered and well built - worth the money if you have multiple bikes and/or change tires with some regularity.